Layout Component
Firstly we will create a new component that will center the main content of the page.
Create a new Layout component.
// components/Layout.js
const Layout = ({ children }) => {
  return (
    <div className="mx-auto md:px-4 md:max-w-3xl min-h-screen">
      {children}
    </div>
  );
};

export default Layout;
Do we need to import React in Next.js projects components? Only if you need to use the keyword React. (React.Component)
Then we will update the content of index.js.
// pages/index.js
import Layout from "../components/Layout";
import Hero from "../components/Hero";

export default function Home() {
  return (
    <Layout>
      ...
      <main className="bg-white p-4">
        <Hero />
      </main>
    </Layout>
  );
}
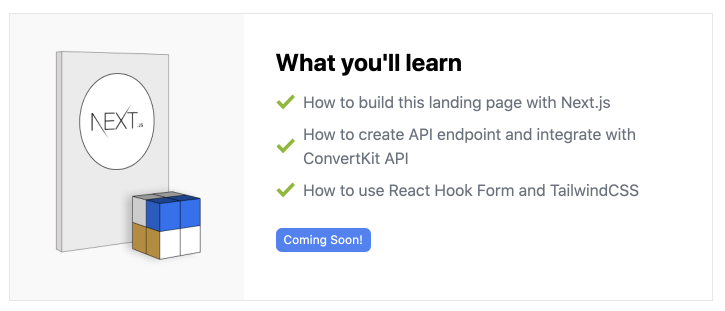
Hero Component
Instead of growing the markup of the home component, lets create a new Hero component.
// src/components/Hero.js
import { Tick } from "../../icons";

const outcomes = [
  "How to build this landing page with Next.js",
  "How to create API endpoint and integrate with ConvertKit API",
  "How to use React Hook Form and TailwindCSS",
];

const ComingSoonBadge = () => (
  <span className="bg-blue-500 text-white text-xs py-1 px-2 rounded-md mb-4 inline-block">
    Coming Soon!
  </span>
);

const Hero = () => {
  return (
    <div className="border border-gray-200 md:flex md:flex-row">
      <div className="bg-gray-100 text-center md:w-1/3">
        <img
          className="object-contain mx-auto"
          alt="Next.js 101"
          src="/assets/img_nextjs-101-cover.png"
        />
      </div>
      <div className="px-4 md:px-8 py-6 self-center md:w-2/3">
        <h2 className="font-bold text-2xl mb-3">What you'll learn</h2>
        {outcomes && (
          <ul className="mb-6">
            {outcomes.map((i) => (
              <li key={i} className="text-gray-700 flex mb-2">
                <span className="self-center mr-2">
                  <Tick className="h-4" />
                </span>
                <span className="opacity-75">{i}</span>
              </li>
            ))}
          </ul>
        )}
        <ComingSoonBadge />
        <div>SIGNUP FORM GOES HERE</div>
      </div>
    </div>
  );
};

export default Hero;
Icons with SVGR CLI
![]()
To import SVG as a React component, I have used SVGR.
It has a nice CLI option to specify a folder with SVG icons and it automatically creates React components for all of them.
Images
Place your images in the /public/ folder and then reference them in your markup like were are referencing the course cover image.
Next.js also provides an optimised <Image /> component that will load the image only when it is visible in the viewport, plus other performance benefits.
Read more about the Image component.
Now we have a nice responsive layout for our signup form.