React Query 3 - Breaking Changes
React Query 3 will require 2 small changes to our code, add QueryClient and destructure mutate from an object to make everything work.
The UI Issues
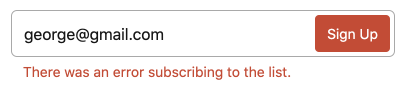
The subscribe process works, but the UI is not really user friendly.
- the user doesn't know that the request is pending
- the user can submit the form multiple times
- we are not showing any error messages in the UI
- we are not reseting the form
How to fix all this? We could use React's useState and handle isLoading, isSuccess and isError ourselves.
Instead of the that we will use React Query to handle it for us.
React Query
React Query is data-fetching library for React.
It makes it easy to fetch, cache, synchronize and update data from API endpoints.
What I like the most about React Query is the hooks based API and the ability to update isLoading, isError and isSuccess during the request.
We will use the mutation API to keep track of the state in our component.
Installation and Setup
Firstly install React Query.
// we need this
npm i react-query
Then use it in the SignupForm component.
// src/components/SignupForm.js
import { useMutation } from "react-query";

const SignupForm = ({ title }) => {

    const subscribe ...

    const [ mutate, { isLoading } ] = useMutation((data) => subscribe(data));

    const onSubmit = (data) => mutate(data);

}
We can remove the hardcoded isLoading, and use isLoading value returned by useMutation.
On form submit we will run mutate and pass in the form data.
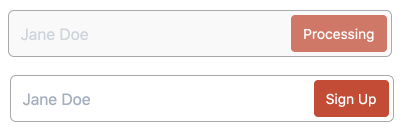
Now we should see the form styles updated while the request is pending and isLoading is set to true.
Success Message
In the same way we can get access to isSuccess and show the SuccessMessage component when the request is completed.
We can move this component outside and use an early return statement if isSuccess value is true.
const SignupForm = ({ title }) => {
    const [ mutate, { isLoading, isSuccess } ] = useMutation((data) => subscribe(data));

    if (isSuccess) {
        return <SuccessMessage />;
    }

    return (...)
}
Error Message
If the request fails we will want to show the reponse in the UI. For that we can destructure isError from the mutation.
const [ mutate, { isSuccess, isLoading, isError, error } ] = useMutation((data) => subscribe(data));

const SignupForm = ({ title }) => {

    return (
        <form>
            ...
            {isError && <ErrorMessage message={error} />}
        </form>
    )
}
Now we have the UI responding to all the different states of the request.
UI state Summary
Invalid form input or error returned by the API.
Loading state and default state.
Success message displayed after a succesfull submission.

Reset form and state
The last outstanding bit is to show the form again.
We can set a timer and hide it after 3 or 4 seconds, or add close icon to let the user do it.
import { Cross } from "../icons";

const SuccessMessage = ({handleReset}) => (
  <p className="text-sm p-3 bg-green-100 border rounded-md border-success text-success inline-flex">
    <span>Success. Check your inbox and confirm your email.</span>
    <span className="self-center flex mr-1">
        <button
            onClick={() => handleReset()}
            className="bg-success text-white rounded-full h-4 w-4 mt-auto ml-1 hover:bg-red-500 transition-colors duration-200"
        >
            <Cross className="h-2 w-2 mx-auto" />
        </button>
    </span>
  </p>
);

const SignupForm = ({ title }) => {
    const [ mutate, { isLoading, isError, error, isSucccess, reset } ] = useMutation(({ email }) => subscribe(email));

    if (isSuccess) {
        return <SuccessMessage handleReset={reset} />;
    }
    ...
}
We get the reset from the mutation and pass it to SuccessMessage as handleReset prop.
Inside of the success message we will add a button with the cross icon and fire the reset on button click.
React Query 3 - Fix
React Query 3 has been released since I have recorded this video. Here are the step necessary to make our code work.
1. Add QueryClient

// _app.js
import { QueryClient, QueryClientProvider } from "react-query";
import "../styles/tailwind.css";

// Create a client
const queryClient = new QueryClient();

function MyApp({ Component, pageProps }) {
  return (
    // Provide the client to your App
    <QueryClientProvider client={queryClient}>
      <Component {...pageProps} />
    </QueryClientProvider>
  );
}

export default MyApp;
2. Update useMutation
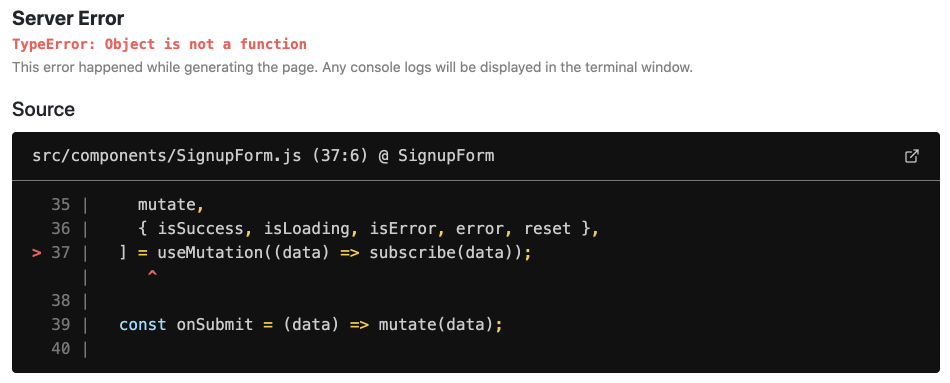
The useMutation hook now returns an object instead of an array.
// SignupForm.js
const SignupForm = ({ title }) => {
    ...

    const {
        mutate,
        isSuccess,
        isLoading,
        isError,
        error,
        reset,
    } = useMutation((data) => subscribe(data));

    ...
    return (...)
}
And that is it, after making these two changes our form mutation works fine again.